Incident Management
Track, acknowledge, investigate, and resolve incidents from a single timeline. Collaborate with War Rooms, write postmortems, and force-resolve stuck incidents.
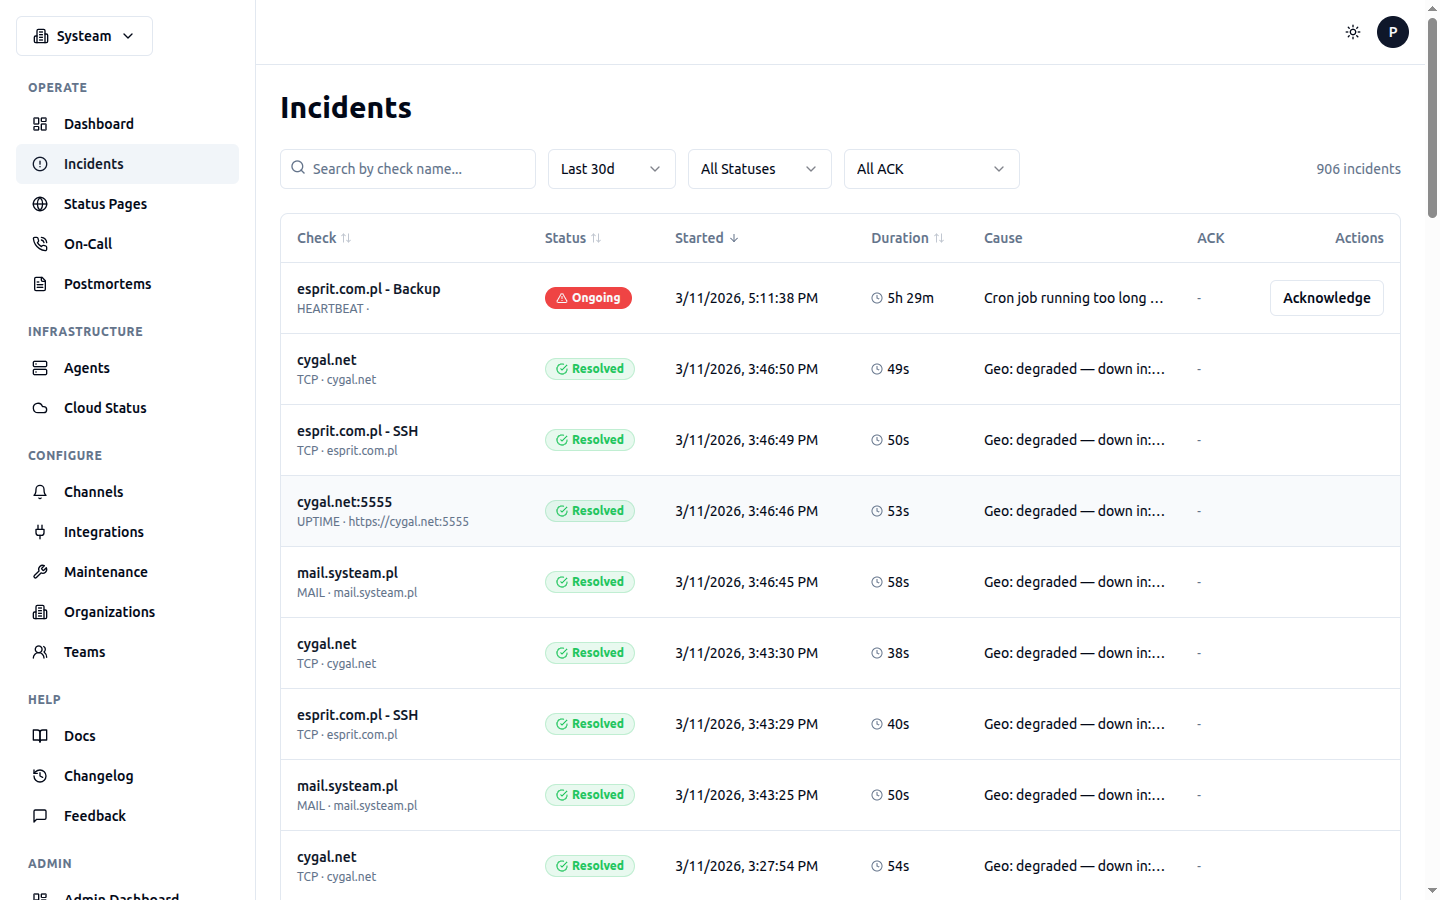
Incident list with status, duration, cause, and acknowledgment controls
Overview
An incident is created when a check transitions to a bad state (DOWN, DEGRADED, or LATE) or when an external alert triggers via the Inbound Events API. Incidents are the central object for tracking outages and coordinating response.
Two types of incidents exist:
- Check incidents — created automatically when a health check detects failure. Resolved automatically when the check recovers (goes UP).
- Inbound incidents — created via the Events API. Can be triggered, acknowledged, snoozed, and resolved via API actions or the UI.
Check Incidents
Check incidents appear in the Incident History panel on the check detail page. Click any incident to open its detail page with full context.
Incidents are labeled with the worst state they reached — a brief degradation that became a full outage shows as DOWN. The label is consistent across the incident feed, the check page, reports, and status pages. On the check detail page, status-transition entries in the event log include a Show on chart button that zooms the response time chart to the incident window (see Outage Bands & Incident Markers).
Incident Detail Page
The incident detail page has five tabs:
| Tab | Contents |
|---|---|
| Timeline | Chronological list of all incident activities (creation, escalation, ACK, resolution, notes, war rooms, role changes) |
| Notes | Free-text notes added by team members during investigation |
| War Room | Shared meeting spaces for real-time collaboration |
| Roles | Assign responders to incident roles (see below) |
| Details | Check name, type, target, project, times, duration, cause, acknowledgments |
Acknowledgment (ACK)
Acknowledging an incident signals that someone is actively working on it. ACK has two effects:
- Stops escalation — no further escalation steps will fire
- Suppresses repeated notifications — only recovery notifications are sent after ACK (the initial failure alert is not repeated)
Incidents can be acknowledged from wherever the alert reaches you:
- UI button — click Acknowledge on the incident detail page
- Slack — a native interactive button on the alert message. One click, no page load.
- Discord — a "Click here to acknowledge" link in the alert embed (Discord doesn't support native buttons the same way Slack does)
- Email — a magic link that opens a confirmation page; acknowledgment only happens after you confirm, not just by opening the link
- Voice call (Twilio/Telnyx/Plivo) — press 1 on your phone's keypad (DTMF) when the call announces the incident
- API —
POST /api/checks/{check_id}/incidents/{log_id}/ack
Tip
Warning
Force Resolve
Sometimes an incident needs to be closed manually even though the underlying check has not recovered. The Force Resolve button on the incident detail page does this.
Force resolving an incident:
- Stops any active escalation for this incident
- Closes all auto-created War Rooms
- Records a "force resolved" activity in the timeline
- Publishes an SSE event for real-time UI updates
Warning
Incident Roles
Assign responders to standard incident-response roles from the Roles tab on the incident detail page:
| Role | Typical responsibility |
|---|---|
| Incident Commander | Owns the overall response and final decisions |
| Deputy | Backs up the Commander, takes over if needed |
| Ops Lead | Drives the technical mitigation work |
| Comms Lead | Handles internal/external status updates |
| Scribe | Keeps the timeline and notes accurate |
| SME | Subject-matter expert brought in for specific context |
More than one person can hold the same role at once (for example, two SMEs from different teams). Assigning or removing a role is recorded as an activity on the Timeline tab, and if the incident has a chat-capable war room, it's posted there too.
Notification Delivery Audit Trail
Every notification attempt for an incident — alert, escalation step, or reminder — is logged so you can verify who was actually notified and whether it succeeded.
[
  {
    "id": 501,
    "channel": "slack",
    "target": "#ops-alerts",
    "status": "sent",
    "error": null,
    "context": "escalation",
    "created_at": "2026-02-12T10:31:04Z"
  },
  {
    "id": 502,
    "channel": "sms_twilio",
    "target": "+48***4567",
    "status": "failed",
    "error": "Invalid phone number",
    "context": "alert",
    "created_at": "2026-02-12T10:31:05Z"
  }
]
type is check or inbound; ref is the check incident log ID or the inbound incident ID. context distinguishes the initial alert (alert) from later re-notifications (escalation, reminder).
War Rooms
War Rooms are shared meeting or chat spaces for coordinating incident response in real-time. A War Room has two independent halves — a text/channel half and a call bridge (video/voice) half — either or both can be set. The default channel half is a built-in, encrypted native chat that needs no external service; several providers on either half can auto-create their room via API:
| Provider | Half | Auto-Create | Configuration |
|---|---|---|---|
| In-App Chat (native) | Channel (text) | Yes (default, zero-config) | None — built-in, encrypted at rest |
| Slack Channel | Channel (text) | Yes (Bot API) | Slack Bot Token |
| Discord Text | Channel (text) | Yes (Bot API) | Discord Bot Token + Guild ID |
| Jitsi Meet | Call bridge (video) | Yes (zero-config) | None — instant room generation; the default call bridge |
| Google Meet | Call bridge (video) | Yes (Calendar API), if configured | Service account JSON with domain-wide delegation + impersonate email; falls back to the “New Meet” button (opens meet.google.com/new) when unconfigured |
| Zoom | Call bridge (video) | Yes (Server-to-Server OAuth), if configured | Account ID + Client ID + Secret; falls back to paste-URL when unconfigured |
| Discord Voice | Call bridge (voice) | Yes (Bot API) | Discord Bot Token + Guild ID |
| MS Teams | Call bridge (video) | Yes (Graph API) | Tenant ID + Client ID + Secret |
| Slack Huddle | Call bridge (voice) | No (paste URL) | Start huddle in Slack, share link |
| VS Code LiveShare | Debug (paste-link only, not yet in the picker) | No (paste URL) | Paste Live Share session URL |
Manual War Rooms
Click Start War Room in the War Room tab of any incident. The dialog offers two independent pickers — a channel (chat) provider and a call bridge (video/voice) provider — set either, both, or neither. For providers marked Auto-Create, the URL is generated automatically once the org has the required credentials in Settings > War Room Auto-Creation — no need to paste anything. Jitsi is the default call bridge and needs no configuration at all. Providers without credentials configured fall back to a paste-URL field (Zoom, Slack Huddle, VS Code Live Share) or a “New Meet” helper button (Google Meet).
Auto-Created War Rooms
War Rooms can be created automatically when escalation fires. See On-Call > War Room Auto-Creation for setup. Auto-created rooms display an Auto badge and are automatically closed when the incident resolves.
Native In-App Chat
The default In-App Chat provider gives you a full incident chat without leaving Syschecks or configuring any external service. It opens right inside the incident War Room tab and updates in real time for everyone viewing the room.
- Messages appear instantly for you and stream live to other participants.
- Participants column (on the right of the chat) shows who is in the room, a live green dot for who is currently online, and each person's incident role (Commander, Scribe, …) when assigned.
- Auto-join — anyone who posts a message or file automatically joins the participant list, so the roster reflects who is actually working the incident.
- Add / remove people — admins can add any organization member with Add people, or remove someone with the × next to their name.
- Attachments — attach files (screenshots, logs, PDFs, docs) with the paperclip, or simply paste a screenshot from your clipboard straight into the message box. Images preview inline; other files show as a download link.
- Emoji picker and clickable links (URLs in messages are auto-linked) round out the chat.
Encrypted end to end at rest
Finding Active War Rooms
The War Rooms item in the sidebar lists every active room across your organization and shows a badge with how many are open. Opening one jumps straight to that incident's War Room tab. When a room is closed it drops off the list and the badge count goes down.
War Room Members
War rooms have members who are participants in the incident response. When a war room is auto-created, on-call responders from the escalation policy are automatically added; in native chat, anyone who posts also joins automatically. You can manually add or remove members at any time.
If users have linked their platform accounts (Discord, Slack, MS Teams) in their Profile > Linked Platforms, they receive automatic invites to the platform room when added as war room members.
War Room Providers
Organization admins configure the default channel and call bridge, plus credentials for each auto-creating provider, in Settings > War Room Auto-Creation:
| Provider | Setup Required | Notes |
|---|---|---|
| Jitsi Meet | None | Free, works instantly, auto-generates meeting URLs |
| Google Meet | Service account JSON (domain-wide delegation, Calendar API) + impersonate email | Creates a Calendar event with a Meet link; without credentials, falls back to the “New Meet” button (not auto-created) |
| Discord (Text or Voice) | Bot token + Guild ID | Creates a voice or text channel in your Discord server |
| Slack Huddle | None | No bot integration — start a huddle in Slack and paste the link back (not auto-created) |
| MS Teams | Tenant ID + Client ID + Secret | Creates online meetings via Azure AD app |
| Zoom | Server-to-Server OAuth app (Account ID + Client ID + Secret, meeting:write:admin scope) | Creates a real Zoom meeting via the Zoom API; without credentials, falls back to paste-URL (not auto-created) |
| VS Code LiveShare | None | Paste the session URL (not auto-created) |
Use the Test Connection button to verify bot credentials before saving.
Live Updates Inside the War Room Chat
For chat-capable war rooms (In-App Chat, Slack Channel, and Discord Text), the incident doesn't just get a room — the room stays in sync with the incident:
- An initial message summarizing the incident is posted as soon as the room is created
- Acknowledgment, resolution, snooze/unsnooze, escalation steps, priority changes, notes, and role assignments are all posted into the channel as they happen
This means responders who live in Slack or Discord can follow (and act on) the whole incident without switching to the Syschecks UI.
Closing War Rooms
Click the × button on an active War Room to close it. Auto-created rooms are also closed automatically on incident resolution. Manual War Rooms stay open until explicitly closed, which is useful for postmortem discussions.
Inbound Incidents
Inbound incidents are created via the Inbound Events API. They support additional actions beyond check incidents:
| Action | Description |
|---|---|
| Acknowledge | Mark as being worked on, stop escalation |
| Unacknowledge | Re-enable escalation if needed |
| Snooze | Temporarily suppress escalation for a set duration |
| Unsnooze | Resume escalation before snooze expires |
| Resolve | Close the incident |
| Set Priority | P1 (Critical) through P5 (Informational) |
Inbound incident detail pages have the same four tabs (Timeline, Notes, War Room, Details) plus an Events tab showing raw inbound events.
Postmortems
After an incident is resolved, you can create a Postmortem from the incident detail page. Click Create Postmortem to start.
A postmortem includes:
- Summary — what happened
- Impact — who was affected and how
- Root Cause — why it happened
- Action Items — checklist of follow-up tasks
- Timeline — auto-populated from incident activities
Postmortems have a Draft and Published status. Draft postmortems are only visible to org members. Published postmortems can be shared.
Managing Postmortems
Navigate to On-Call > Postmortems to view all postmortems across your organization. You can filter by status (Draft/Published) and search by title. From the incident detail page, click Create Postmortem to link a postmortem to a specific incident — the timeline tab auto-populates from incident activities.
Incident Priority
Inbound incidents can be assigned a priority level to help triage and prioritize response:
| Priority | Use Case |
|---|---|
| P1 — Critical | Complete service outage, immediate action required |
| P2 — High | Major degradation, user-facing impact |
| P3 — Medium | Partial impact, workaround available |
| P4 — Low | Minor issue, no immediate user impact |
| P5 — Informational | Advisory, no action needed |
Noise Reduction
Several features help reduce alert fatigue:
Flapping Detection
When a check rapidly toggles between UP and DOWN (more than 5 times in 10 minutes), the system marks it as flapping and suppresses repeated notifications until the status stabilizes. This prevents alert storms from unstable network connections or services that are bouncing.
Suppression Rules
Create rules to automatically suppress inbound events that match specific patterns. Go to Integrations > Suppression Rules to manage rules.
| Field | Description |
|---|---|
| Field | Which event field to match: summary, source, component, severity |
| Operator | contains, equals, or regex |
| Value | The pattern to match against (e.g., "test-", "staging") |
Suppressed events are logged but do not create incidents or trigger notifications. Use this for known non-actionable alerts from noisy monitoring systems.
Alert Grouping
Configure a time window on integration keys to merge rapid-fire alerts into a single incident. When grouping_type is set to time_window, events arriving within the window increment the alert_count on the parent incident instead of creating new ones.
Other Noise Reduction
- Alert-after-X-failures — only alert after consecutive failures exceed a threshold
- Quiet hours — suppress notifications during configured off-hours (see Organization Settings)
- Maintenance windows — suppress alerts during planned downtime (see Maintenance Windows)
Real-Time Updates
Incident state changes are pushed to all connected clients via Server-Sent Events (SSE). Events include:
incident.new— new incident startedincident.resolve— incident resolvedincident.ack— incident acknowledgedwarroom.created— War Room created (manual or auto)warroom.closed— War Room closed
The dashboard and incident detail pages update automatically when these events arrive, with a fallback polling interval of 30–60 seconds.
Best Practices
- Always acknowledge incidents promptly to stop unnecessary escalation
- Use War Rooms for high-severity incidents involving multiple responders
- Write postmortems for major incidents to prevent recurrence
- Configure flapping detection for checks with known intermittent issues
- Use Force Resolve sparingly — only when you're certain the incident is handled even though the check hasn't recovered
- Set up escalation policies to ensure someone always responds